Templating
Creating your own pattern is a great way to get exactly what you want. It’s also a way to save on costs. We are experts at turning well-executed patterns into a dream grip kits. If you need some guidance please check out our patterning video, which includes a simple step-by-step process. To buy a patterning kit, click the link below.

Patterning Process Steps
Making a good physical pattern or template is essential to getting a good fit from your new high-quality Raptor Deck Kit. Below are some tips and tricks to make the process easy and the end result an outstanding finish.
- Choose a good stable pattern material as step one. The most cost effective and readily available suitable product is the heavy gauge clear Ployfilm which can be found at most home improvement centers. Stay away from painters plastic, as it tends to be too thin, and lacking in dimensional stability.
- Roughly cut your plastic to fit areas to be patterned, and hold down with small pieces of double-sided tape, throughout the patterning process, especially if you will be crawling around while marking out your parts.
- Mark out each desired panel with a thin point Sharpie marker. If multiple panels will create a kit, it’s a good idea to mark out the spacing between panels where possible. This allows Raptor to re-assemble the whole kit accurately in our CAD software.
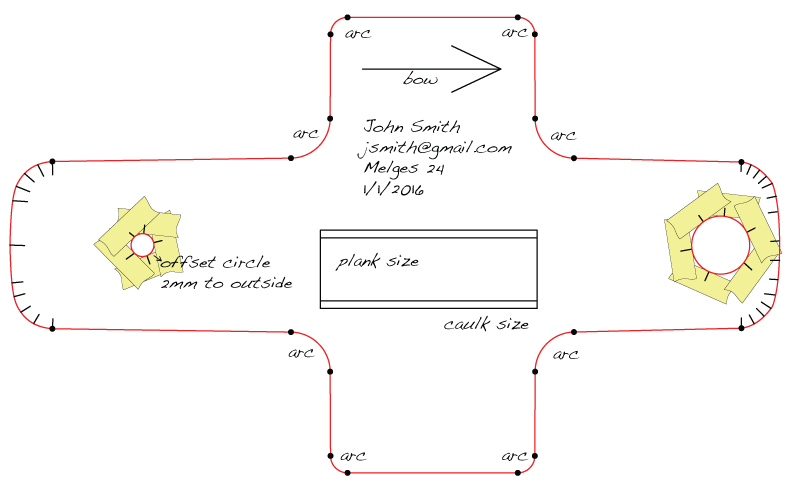
- Taping panels together, add a few hash marks and trace an edge with a pen that they can re-assemble if they become separated during shipping.
- If tracing an old grip line, it’s a good practice to build up your new panels just slightly bigger to hide those edges. This can be done by tracing the grip line, then noting directly next to it how many millimeters you would like the final pieces offset and drawing arrows to indicate which side.
- Long subtle curves can sometimes best be modeled using masking tape. Make sure to indicated which side of the masking tape is the true-up.
- It’s important to mark snap heads, screws, and cutout circles to a very high degree of accuracy. If pattern lines are shaky, indicate exactly which points fall on the circle edges with small hash mark ticks.
- Placing a small dot at the ends of all straight segments will let us know those sections are straight, even if the drawn line is somewhat wavy.
- Write contact info on each panel and place an arrow pointing at the bow.
- Mail pattern to: 6317 Seaview Ave NW Seattle WA, 98107, USA.
Installing
The 3M backer is quite aggressive. Wash the decks to remove all salt residue, you can use acetone, denatured alcohol or Windex.
Normally we dry fit the pads and make a couple marks with a pencil for true up. Then flip the pad over and slice the backing paper down the middle with a sharp razor, without cutting the foam. Peel back the paper on one side, exposing around 1” band of sticky. Gently lay the pad down and check alignment.
When aligned, proceed to peel the backing paper from center out and smooth the pad down in a sweeping motion.
For more information, check out our video below.


2.5MM

5MM
